

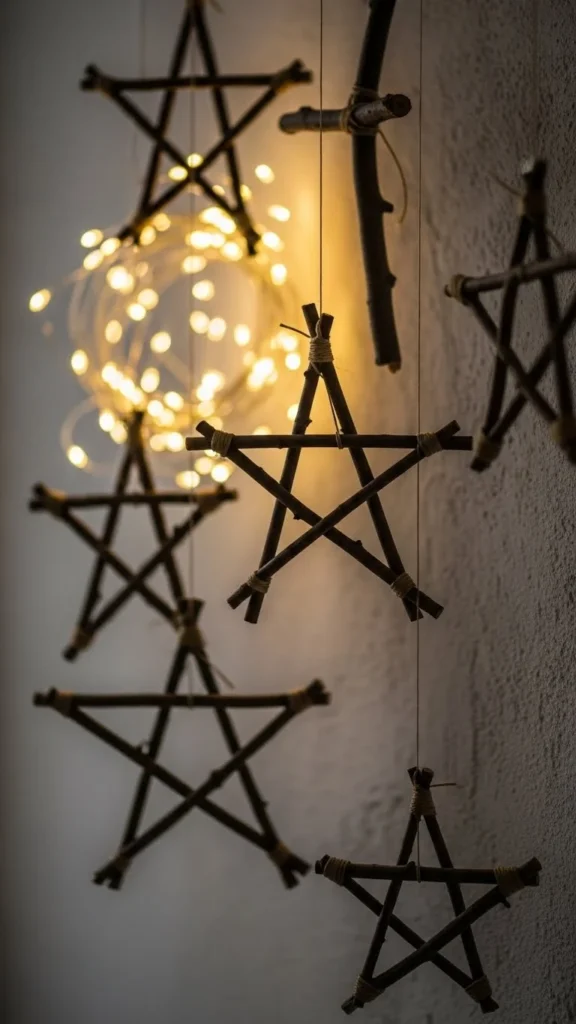
If you want a Christmas wall decoration that looks handmade, natural, and cozy, rustic stick stars are the perfect project. They’re budget-friendly, quick to assemble, and add that warm woodland charm to any room. You can hang them above your mantel, beside your tree, or create a full star wall for an eye-catching holiday display.
Christmas decorations don’t have to be complicated. Sometimes the simplest materials—twigs, twine, and a little creativity—make the biggest impact. Let’s walk through how to create these beautiful stars step-by-step.
Gather Your Natural Materials
Before you start, take a quick walk outside to collect the right sticks. This project works best with straight, dry twigs.
- Look for sticks about 10–12 inches long
- Aim for pieces that are roughly the same thickness
- Choose twigs that feel sturdy, not brittle

Once you have your sticks, bring them inside and brush away any loose dirt. If you want a slightly polished look, you can gently wipe them with a dry cloth. Keeping the natural texture is what gives your stars that rustic charm.
Build the Basic Star Shape
Creating the shape is easier than it looks. You only need five sticks per star.
- Form an open triangle with three sticks.
- Overlap the next two sticks to shape the star points.
- Adjust the angles until the shape looks balanced.
- Secure each intersecting corner with twine.

When tying each connection, make small tight loops. Wrap several times around the intersection, then knot firmly. Don’t worry about perfection. A little unevenness adds character and gives the finished star its handmade look.
Add Twine, Ribbon, or Touches of Greenery
Once your basic star is fully stable, it’s time for the fun part—decorating it. Keep the rustic theme alive with natural accents.
Try adding:
- A twine bow on one point
- Small sprigs of cedar or pine
- A cluster of mini pinecones
- A hint of faux berries for color
- A thin ribbon loop for hanging
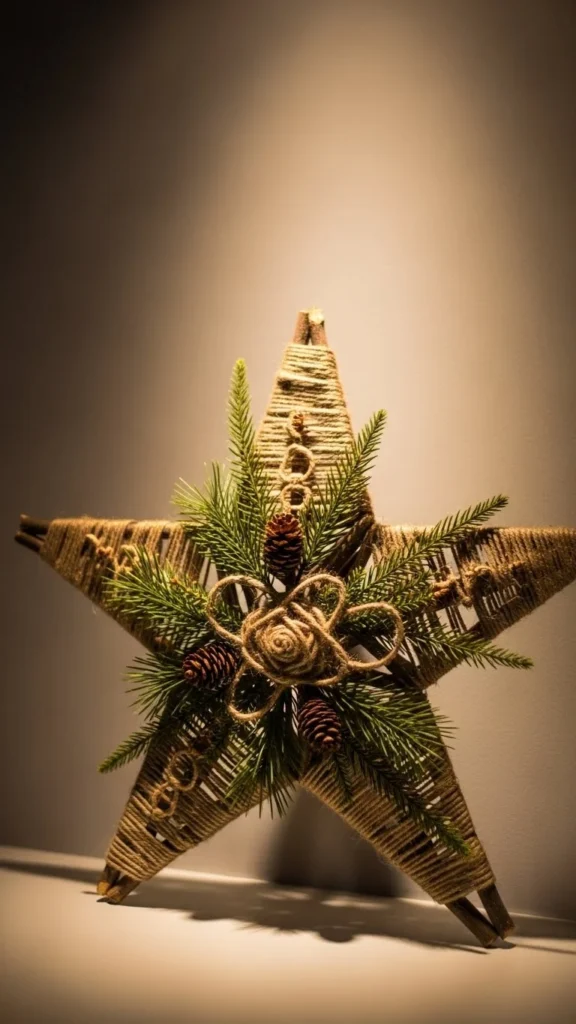
You don’t need to overload the star. A few small details go a long way. If your décor leans minimalist, leave the sticks bare and only add a hanging loop. If you love a fuller holiday look, layer more greenery and textures.
Make Different Sizes for a Wall Display
One of the best parts of stick stars is how customizable they are. Mix different sizes and create a full gallery wall.
- Small stars: 6–8 inch sticks
- Medium stars: 10–12 inch sticks
- Large stars: 16–18 inch sticks
Play with arrangements:
- A vertical line of three stars
- A cluster of mixed sizes
- A large centerpiece star surrounded by smaller ones
- A wall corner display for visual impact
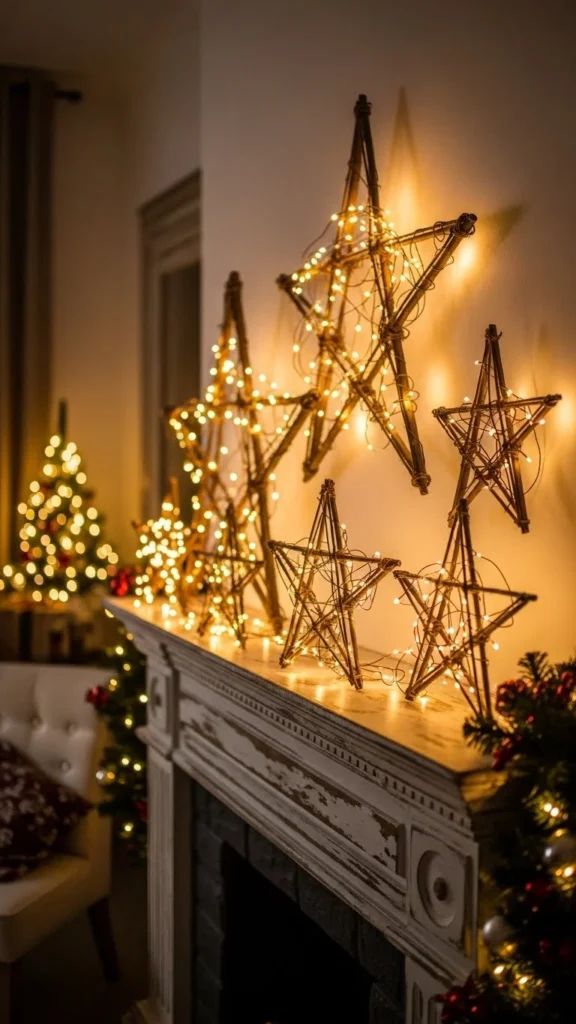
A collection of stars can make even a plain space feel festive. They pair beautifully with garlands, candles, and woven baskets.
Tips for Long-Lasting Stick Stars
To help your Christmas stick stars stay sturdy year after year, keep these tips in mind:
- Use strong twine or thin jute rather than delicate thread.
- Choose dry sticks only—fresh ones can warp as they dry.
- For extra hold, dab a tiny bit of clear glue under the twine wraps.
- Store the stars flat in a cool, dry place after the season.
If you’re hanging them above a heater or near lights, check them occasionally to make sure the twigs stay firm and secure.
Fun Variations to Try
After making your first star, you may want to experiment with different styles.
- White-washed stars: Lightly brush white craft paint over the sticks.
- Glitter-dipped tips: Use a tiny amount of adhesive and sprinkle a subtle shimmer.
- Mixed-material stars: Combine twigs with cinnamon sticks or dried orange slices for fragrance.
- Oversized statement star: Use long branches to create a dramatic, rustic wall piece.
These variations keep the project exciting and help you match different décor themes throughout your home.
Final Thoughts
Rustic DIY Christmas stick stars are one of those projects that look beautiful, cost almost nothing, and bring a handmade feeling to your holiday décor. Whether you make one star or a whole wall of them, they add instant charm and warmth to your space.
Save this idea to your holiday board—and give it a try this season! Your walls will thank you.

Leave a Reply