

Turning old sweaters into cozy Christmas stockings is one of the easiest ways to add charm to your holiday décor. It’s affordable, stylish, and a great way to give forgotten clothing a second life. Plus, every stocking becomes its own little work of art—soft, textured, and totally unique.

If you love warm, handmade holiday projects, this guide will walk you through each step. Whether you’re crafting for your family, your mantel, or as thoughtful gifts, these stockings bring an extra layer of comfort and nostalgia to your home.
Gather Your Materials
Before you start cutting, prepare your tools and choose sweaters that will hold their shape well.
What You’ll Need:
- Old sweaters (chunky knits, cable knits, and soft wool blends work best)
- Scissors or fabric shears
- Paper for your stocking template
- Pins or sewing clips
- Needle and thread or a sewing machine
- Ribbon, pom-poms, or buttons for decoration
Choose sweaters that have:
- A beautiful texture
- A pattern that looks good when cut vertically
- A bit of stretch for a snug, clean shape

Step 1: Make Your Stocking Template
A template ensures every stocking looks symmetrical and professional.
How to Make It:
- Grab a stocking you already love and trace it on paper.
- Add a half-inch around the border for seam allowance.
- Cut out your paper pattern.
If you don’t have a stocking to trace:
- Draw a simple boot shape.
- Keep the foot round, the top wide, and the heel smooth.
- Remember, soft curves sew better than sharp corners.
This paper template becomes your guide for every future stocking, so store it safely once you’re done.
Step 2: Cut Out the Stocking Shape
Lay your sweater flat and smooth out any wrinkles.
Tips for Cutting:
- Position your template over the prettiest section of the sweater, such as a cable-knit braid or a fair-isle stripe.
- Pin the template in place so the sweater doesn’t shift.
- Cut slowly along the outline to avoid fraying.
Cut two identical pieces:
- One for the front
- One for the back
If the sweater has a ribbed hem, consider using it as the stocking’s top edge—it adds a polished look with zero extra work.
Step 3: Sew the Pieces Together
Once both pieces are cut, place them together with the right sides facing inward.
Sewing Instructions:
- Pin around the edges to keep the fabric aligned.
- Sew slowly around the stocking outline, leaving the top open.
- Turn the stocking right-side out and gently shape the toe and heel.
If your sweater fabric is thick or very stretchy:
- Use a zigzag stitch for flexibility.
- Hand-sew with strong thread for curves that need more control.

Once you flip it inside out, you’ll instantly see the cozy stocking take shape—always the most satisfying moment.
Step 4: Add a Lining (Optional but Recommended)
A lining makes your stocking sturdier and prevents stretching over time, especially if you plan to fill it with treats and small gifts.
How to Line It:
- Cut two pieces of cotton fabric using the same template.
- Sew them together just like you did with the sweater.
- Insert the lining inside the knit stocking.
- Fold the raw edges inward and sew the lining and sweater together at the top.
This step also hides any seams and keeps the inside neat and smooth.
Step 5: Add a Hanging Loop
A stocking isn’t complete without a loop for hanging on the mantel.
Easy loop ideas:
- A strip of fabric from the sweater hem
- A piece of matching ribbon
- Braided yarn for a handmade look
Fold the loop and sew it securely into the inside of the stocking’s top edge.
Step 6: Decorate Your Stocking
Now comes the fun part—making your stocking extra beautiful and personal.
Decoration Ideas:
- Add pom-poms along the edge
- Sew on wooden buttons
- Create felt initials for each family member
- Add lace, velvet ribbon, or greenery sprigs
- Use embroidery thread for simple holiday motifs
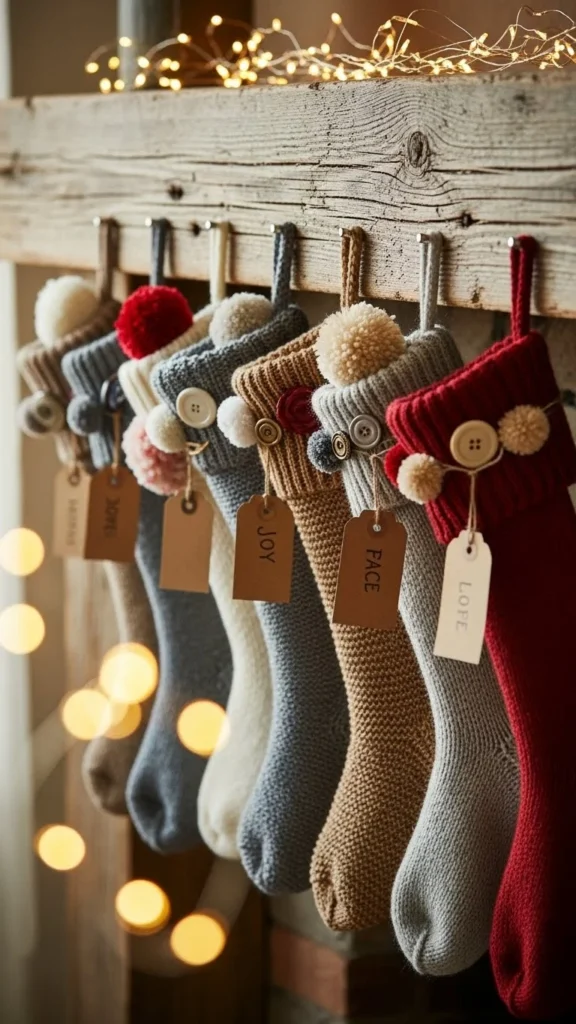
Keep the style consistent if you’re making multiple stockings, but let each one have a tiny detail that sets it apart.
Step 7: Display and Enjoy
Once your stockings are finished, hang them in your favorite holiday spot:
- Above the fireplace
- Along a staircase rail
- On bedroom doors
- On a decorative ladder
Their soft textures instantly add warmth, making every room feel festive and welcoming.
Final Tips for Perfect Upcycled Stockings
- Choose sweaters in complementary colors for a cohesive set.
- Thrift stores are great places to find unique knits.
- Use thick, high-quality thread for long-lasting seams.
- Mix textures—chunky knits, smooth wool, and patterned weaves.
These little details elevate the final look and make the stockings feel boutique-quality.
Make This Your New Holiday Tradition
Crafting stockings from old sweaters is simple, charming, and full of personality. Every piece tells a story, and each year you can add a new design to your collection.
If you loved this project, save this idea to Pinterest for later and start gathering sweaters—you’ll be surprised how beautiful they become when transformed into handmade Christmas stockings!

Leave a Reply